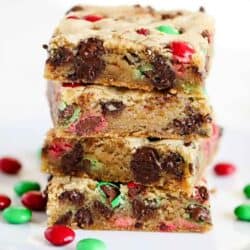
These mini M&M cookies are soft and chewy and loaded with colorful M&M candies. They are adorable bite sized treats perfect for cookie lovers of all ages!
Love M&M’s? Don’t miss my m&m brownies and m&m cookie bars, too!

Table of Contents
Soft and Chewy Mini M&M Cookies
These mini M&M cookies are a bite-sized version of my m&m cookies and of the best cookie recipes! Choose your colors and make mini dessert versions of Valentine’s M&M cookies, 4th of July cookies, and M&M Christmas cookies!
They’re a fun snack to have when friends come over and they made a colorful addition to any cookie tray. I love that mini chocolate chip cookies are the perfect size to fit into the smallest lunch box containers.
Ingredients
These chewy cookies are perfectly mixed together for the best mini M&M cookies.

Find the full printable recipe with specific measurements below.
- Butter: Follow these steps on how to soften butter so it’s at room tempearture.
- Sugars: Brown sugar adds moisture and flavor while white granulated sugar adds sweetness.
- Baking staples: Egg, vanilla extract, all-purpose flour and baking soda.
- Cornstarch: Cornstarch adds a soft and tender texture and prevents cookies from spreading.
- Mini M&Ms: The fun part! Choose whatever colors you want. The traditional pack of rainbow colors is what I used for this mini M&M cookie recipe.
How to Make Mini M&M Cookies
- Wet ingredients: In a large mixing bowl, using a stand mixer with the paddle attachment or using a hand mixer cream butter and both sugars. Stir in the egg and vanilla and mix to combine.
- Dry ingredients: In the same bowl, you’ll mix in the dry ingredients then fold in the mini M&Ms with the flour mixture.
- Scoop: Use a cookie scoop to scoop out the dough into 1-inch balls and place the dough balls far enough apart on a cookie sheet or baking sheet lined with parchment paper.
- Bake: Bake in the oven for 7-8 minutes until they are golden brown. Remove them and allow them to cool on the sheet before moving them to a cooling rack.

Recipe Tips
Here are some helpful tips that will help make these M&M mini cookies even better!
- Save some mini M&M‘s for the tops. Just before you put them in the oven, place a few more so that they are visible. It’s just for presentation but it’s worth it!
- Don’t walk away from the oven! These little guys don’t take long to bake at all. To keep the soft center, remove them from the oven as soon as the 7-8 minutes are up.
- Keep baking. They will continue baking a bit on the hot sheet, which is why we leave them there before moving them to the cooling rack.
- Mini M&M’s Chocolate chip cookies. Add some mini chocolate chips into the batter for added chocolate taste and texture.
- Extra chocolate. Make a mini version of these chocolate M&M cookies with even more chocolate!
- Fun serving idea: These cute little M&M cookies make the best vanilla ice cream toppers! Make a sundae and load it up with whipped cream and these cookies.

More M&M Dessert Recipes


HUNGRY FOR MORE? Subscribe to my newsletter and follow on Facebook, Pinterest and Instagram for all the newest recipes!

Mini M&M Cookies
Video
Ingredients
- ¾ cup (163 grams) unsalted butter , softened
- ¾ cup (145 grams) light brown sugar , packed
- ¼ cup (50 grams) granulated sugar
- 1 large egg
- 1 teaspoon vanilla extract
- 2 cups (280 grams) all-purpose flour
- 2 teaspoon cornstarch
- 1 teaspoon baking soda
- ¾ teaspoon fine sea salt
- 1 cup mini M&M's
- ½ cup chocolate chips , optional
Instructions
- Prep. Preheat the oven to 350°F. Line two baking sheets with parchment.
- Cream wet ingredients. In a large bowl or the bowl of a stand mixer, beat together the 3/4 cup butter, 3/4 cup brown sugar, and 1/4 cup white sugar. Add 1 egg and 1 teaspoon vanilla and mix to combine.
- Add dry ingredients. Mix in 2 cups flour, 2 teaspoons cornstarch, 1 teaspoon baking soda, and 3/4 teaspoon salt until combined. Fold in 1 cup mini M&M's and 1/2 cup chocolate chips, if using.
- Scoop and bake. Use a small cookie scoop (or Tablespoon) to scoop the dough into 1-inch balls and place on prepared baking sheets. Bake 7 to 8 minutes, or until golden around the edges.
- Cool. Remove from oven and let cool on baking sheet before removing to a cooling rack. Store in a covered container up to 3 days.
Notes
- Butter: Make sure to leave the butter out an hour before making or follow these tips on how to soften butter. If using salted butter, only use 1/2 teaspoon salt.
- Cornstarch: The cornstarch in this dough helps the cookies not to spread, while also making the center extra soft.
- Make ahead: This dough can be made 24 hours in advance and stored in the refrigerator until ready to bake.
- Storage: Store in an airtight container for 3 days or freeze up to 3 months. Thaw overnight in the refrigerator before enjoying, or leave at room temperature.
- Freezing cookie dough: Cookie dough balls can also be stored in the freezer for 2-3 months. I like to place the dough on the baking sheet and freeze for 30-60 minutes, or until hard. Then you can stack in a freezer bag or covered container. When ready to bake, place on the pan while the oven is preheating and bake an extra 1-2 minutes.
Nutrition
Nutrition provided is an estimate. It will vary based on specific ingredients used.
Did you make this recipe? Don’t forget to give it a star rating below!
Recipe FAQs
Yes! It’s so convenient sometimes just to pull out some cookie dough from the fridge and have them ready to bake! This dough can be made up to 24 hours ahead of time. Keep it in the fridge, then roll, bake, and eat!
Check out my post for details on how to freeze cookie dough for all the tips. I like to freeze them once I’ve rolled them up. I’ll flash-freeze them on a baking sheet first, so they don’t clump together, then transfer them to a freezer-friendly bag. They can be kept frozen for up to 3 months!
Once you remember you’ve got cookie dough in the freezer for quick and easy access to cookies and your day has been made, take as many as you need out and place them on a baking tray. Let them sit there and thaw out while the oven is preheating and then bake them as directed. Add 1-2 extra minutes of baking time.
Keep the cookies stored in a covered container on the counter. No need to keep them in the fridge. As long as they’re covered they should stay nice and moist!
Categorized as: American, Cookies, Desserts, Freezer-Friendly, Kid-Friendly, Mini, Nut-Free, Vegetarian

Jamielyn Nye is the founder and recipe creator at I Heart Naptime. She is the author of the I Heart Naptime Cookbook and shares easy family-friendly recipes and desserts for every occasion.


These cookies are perfect. Not only were they easy and fun for the kids to make (not to mention the perfect size) but, they really don’t need any chill time to prevent them from spreading. I was nervous because I’ve tried recipes that claim no chilling time and they turn into a big cookie puddle. However, the cornstarch really made such a huge difference. I don’t know how long these are going to last. But I know we are going to make them again.
I am so glad that you tried these and you will be making them again! Thanks for the 5 star review on these mini M&M cookies. I am happy that you enjoyed them.
I used mini M&M’s and mini chocolate chips. So tasty! The small size is fun, and I love that they bake faster, so you can eat them sooner. :)
if there is anything that brings the little kid out of me its these cookies! something about the m&m’s resting on top that brings me back to my childhood!
M&M cookies are the best!! We especially love the mini m&m’s! Chocolate-y & delicious. We make these all the time!
I’m so happy to hear you loved the recipe, Kristyn!
Everything is better mini! :) These cookies were so easy to make and fun to eat. The kids LOVED them. Can’t wait to make them again!
Yay! Happy to hear they were a hit :)
We made these tonight! Not sure what I did wrong lol but mine were way more puffy not flat. Still tasted good though!
Hi Kayla, you could have added a little too much flour (I like to use this technique) or overworked the dough. Make sure to mix just until combined, so you don’t whip too much air into the dough.
We loved these! SO good right out of the oven. I’m going to have to double the recipe next time.
Love to hear that, April!